December 15, 2011

CranPeary Salsa

My husband had some cranberry salsa a few years ago at his work Christmas party. He said he really liked it so he got the recipe and requested I make it. I did and it was soooo sour! And I just didn't care for the combo, even though I love cranberries. I tossed the recipe and I've never had the desire to make it again until the other day when I got this recipe from "Skinny Crock Pot." It's not a crock pot recipe so I'm not even sure why it was on their site, but I'm glad it was! This batch turned out wonderfully, I loved this combination of flavors. It includes pear & apple and I think that worked to tone down the sourness of the cranberries. I added a bit more sugar than it called for. Other than that, I think I followed the recipe pretty closely. Here is how I made it:

CranPeary Salsa
(I came up with that clever name, they just called it plain old 'cranberry pear salsa')

1 1/2 cups fresh cranberries
1 pear, peeled and chopped
1/2 apple, peeled and chopped
1/4 red onion, chopped
1/2 jalapeno, chopped
1/3 cup fresh cilantro
juice of one lime
juice of one orange
3 T honey
3 T sugar
1/2 teaspoon salt

Combine all ingredients in a food processor and blend until smooth. Can sweeten it up or down depending on taste.

I think I'm going to make a batch for our Christmas Eve gathering this year. It's so light & refreshing and it's really pretty & Christmasy looking too!


December 12, 2011

Super Easy Fleece Scarf

I cannot resist the fabric remnants at Joann's. Especially the fleece! They always have so many bundles to choose from and they are so soft & cuddly. And, I have learned how to really get a great deal on remnants at Joann's...the remnants are always half of the current price of the fabric. So, if that particular fabric is on sale, it will ring up the sale price then they will take another 50% off that. Fleece is now 50% off, so as a remnant, they are 75% off! I can't pass up a bargain like that even if I don't have a need for it at that moment. So, yeah, I have lots of random, odd fabric pieces in my stash.

Anywho, I bought some funky print fleece the other day and decided to use a tutorial I found to make a scarf. This blog, Make it and Love it has SO many fun little projects! I used two of her tutorials for Christmas gifts already. THIS sweater bag and THIS pleated scarf. I can't show pics of my finished projects yet, juuuust in case someone sees them who shouldn't ;)

HERE is the link to the Simple Fleece Scarf. I cut my 'ruffles' a bit wider than she did so it is a little 'chunkier'. I admit, this scarf is a bit funky & almost clown-like, but it's soft & warm & fun & different, so I like it.


December 09, 2011

Oatmeal Cake

Today was such a cozy day. It was cloudy and cold, perfect to just stay inside and make a cozy comforting cake. I've made this cake many times. It's yummy and I convince myself it's good for me since it has oats in it! It's from an old church cookbook, here it is:

Lazy Daisy Oatmeal Cake
1 c oats
1 1/4 c boiling water
1 c sugar
1 c brown sugar
2 eggs
1/2 c oil
1 t vanilla
1 1/2 c flour
1 t baking soda
1/2 t salt
1/2 t cinnamon

Place oats in a bowl and pour boiling water over them. Allow it to soak in for about 15 minutes.

In a mixing bowl, combine oil, eggs, sugars & vanilla till fluffy. Add the rest of the dry ingredients then the soaked oats. Bake at 350 for 35-40 min.

For the 'topping' combine:
1/4 c softened butter
3 T brown sugar
3 T milk
3/4 c coconut
1/2 c pecans or walnuts

After the cake has baked, spread this mixture on top. Then broil for 2-3 minutes, until it is bubbly but NOT burned.

Today, I sorta didn't follow that last part about not burning it. The broiling part is always tricky for me. I really should've set the timer for 2 minutes instead of 3. By the time it beeped and I ran to the kitchen, the cake was well-done. So well-done I had to run its smoking self out to the deck to avoid the smoke alarms going off :(

But, it was salvageable. One side was worse than the other and it was really only about the top two millimeters that were burned.


**disclaimer about my awful looking pan...one of my good cake pans is still out on loan since it had birthday cake in it...the other good pan was/is currently housing some delicious Sweet Potato Enchiladas that we had for dinner. So, I was left with this pan which is my vegetable roasting pan. It did the job and after this broiling mishap, it's darker & more awful-looking than ever!

Here's a mostly edible piece. Milk on the side is a must-have.


December 07, 2011

Easy Pumpkin Pancakes

I still have lots of pumpkin puree in the freezer. A good problem! I scribbled this recipe down a while back and made a batch on Sunday. I froze them and it has been our breakfast for this week. So super easy since you just use pancake mix then add a few things to make them yummier & healthier. They turn out really good!

Easy Pumpkin Pancakes

1 1/2 c complete (just add water) pancake mix
1 c oats
2 T brown sugar
2 T flax seed
1 t cinnamon
1 c pumpkin puree
1 1/2 c water

Combine all and cook 'em up!


Making pumpkin things is still allowed even though it's well after Thanksgiving...right? I say yes!

November 30, 2011

Happy Birthday Cakes

My mother-in-law and brother-in-law had birthdays on Monday & Tuesday respectively. I offered to make cakes for them, two separate cakes for their joint party. I didn't want my MIL to slave away on a cake for BIL, nor did I want her to have a store-bought cake. And I didn't want them to have to share a cake like they have in years' past. Yes, I deserve a wonderful daughter/sister-in-law award for my thoughtfulness & hard work. No, not really. I love to cook & bake, especially for special occasions and especially when I can share the goodies, then send them home with the birthday people, thus sparing myself all the extra calories!

So, yesterday was baking day. I knew my MIL loved pineapple so I made a Pineapple Mandarin Orange cake that I've made many times for my Mom for her b-day. It's light, fluffy and delicious. The recipe I always use is on a heavily stained page in an old church cookbook but I found the identical recipe on allrecipes, so here's the link. And here's a not very good pic-


I couldn't exactly cut a piece pre-party just so I could take a picture. And I didn't even think about taking pictures of the cut cake at the party.

And for my BIL...well, he loves chocolate and his favorite cake is dirt cake, that creamy, pudding-y, oreo 'cake' stuff. But, dirt cake was one of the many desserts that was served last week at our big family Thanksgiving meal. So, I decided to do a little something different but still in the same flavor family. I made this chocolate cake for my daughter's b-day a few months ago, minus the candy bars. It's a delicious cake, probably the best chocolate cake I've ever had. Very moist & rich but SO easy since you just use cake mix & pudding mix. And the frosting is just the best. It's an easy cream cheese/cool whip concoction that is the perfect consistency and I love that there's no butter or shortening in it. The recipe calls for crushed candy bars in the frosting, but I used crushed oreos instead and made it kind of a 'cookies & cream' cake.


For this double layered cake, I used this handy old round pan that I bought at Goodwill a while back.


It's an old "Ovenex" pan with a rotating "slider" that makes the cake pop right out of the pan so easily. I only wish I would've found two so I could bake both layers at once! (the picture was taken right after I removed the cake, it is not normally filthy & rusty)

The cakes were a hit, everyone went home fat & happy. Yay!

November 23, 2011

Thanksgivingy Things

I didn't plan on making cut-out cookies for Thanksgiving but my Mom gave us some Thanksgiving themed cookie cutters and a certain 3 year old insisted on making cookies with them. Just cutting shapes with her play-doh wasn't good enough. So, I dug out the sugar cookie recipe I printed off last year along with the perfect icing recipe I found last year and we whipped up a batch of each. I highly recommend these recipes, they are my holiday staples from now on-

The Best Rolled Sugar Cookies

Sugar Cookie Icing

For this batch, I divided the cookie recipe in half, it still made a lot! And then I made one batch of the icing and it only iced about half the cookies. so, that would mean for a whole batch of cookies you would need to...(using my mental calculator)...quadruple the icing recipe...right?

The icing dries hard & shiny just like the recipe said. In fact, it dries so shiny and so quickly that by the time some of the cookies were sprinkled upon, the sprinkles didn't even stick.

Here's my little helper sprinkling-


And those are turkeys, pumpkins and leaves in case you can't tell. We will be taking this batch over the river and through the woods to Granny's house tomorrow.


Here's another Thanksgiving thing we made today, pumpkin pie shakes!


Got the original inspiration here, but that one was just a bit too 'healthy' sounding for me. Not really in the mood for spinach & carrots in my pie smoothie. So then I found this recipe, I made a smaller batch and changed a couple things. I really just threw it all in the blender, but they turned out so good I wish I'd paid more attention to the amounts. My estimation recipe-

Pumpkin Pie Smoothies

1 cup pumpkin puree (mine was frozen)
1 frozen banana
1/4 cup evaporated milk
1 cup skim milk
2 T non-fat vanilla yogurt
1/2 t cinnamon
5-6 almonds
2-3 T real maple syrup

These were delicious and tasted just like pumpkin pie! Actually, I think they were better. I love the flavor of pumpkin pie but the custardy texture just isn't my thing.


And I'll leave you with a couple turkey pics. We have wild turkeys that come around every once in a while. They are lots of fun to watch. If they come close to the house, the kids like to go out on the deck and scare them, they look so goofy when they run away. They seriously look prehistoric.


Next turkey is my daughter's library story time craft creation. He doesn't look too happy and his eyes are a little shifty. Wonder what he's so nervous about?!


Happy Thanksgiving!!

November 19, 2011

Baking & Sewing

Today was one of those very strange days where I crossed off everything from my to-do list and still had some time to spare! The planets must've lined up just right for me. So, I decided to bake a couple things and start a little sewing project with my extra time.

First, I made these Cranberry Corn Muffins from Snack Girl. They turned out really good, especially for not having any oil or butter! I'm planning on making them again but when I do, I will not use the paper muffin liners, they stuck like crazy to them! Hopefully if I generously spray the muffin pan they will come out easier (yeah, I know that would add a bit of oil, but it would be worth it). I ended up just putting all the wet ingredients in the blender along with the cranberries, that helped them get chopped up nice & small. I also added some orange zest like one of the commenters suggested. They didn't rise up super high but they weren't too dense, really just the consistency of a corn muffin but with a sweeter flavor and a little cranberry zing.


Yep, I used up the rest of my Halloween muffin papers.


Next, I baked some bread. I wanted to use this 7-grain cereal that I've had in the freezer for a while. It's a mix of wheat, rye, barley, flax, oats, corn & millet. We bought it on vacation last year at one of my favorite places, War Eagle Mill.


But, I couldn't find a good recipe. So, I just soaked the cereal and substituted them for the oats that were called for in one of my favorite bread recipes. I wasn't sure if it would work but it did! And the dough came out so soft and it rose so nicely, even with the expired yeast I used.


Here's the recipe-

7-Grain Bread
1/4 cup 7-grain cereal (soaked in warm water for an hour or so)

Combine:
1 cup warm water
2 T brown sugar
2 T oil
1 pkg yeast

Dissolve the sugar & yeast and let it sit till foamy. Then add the soaked cereal.

Place in bread machine:
2 cups white flour
1 cup whole wheat flour
1 t salt

Then add the wet ingredients.

My bread machine has been acting funny lately, it always flops when it gets to baking time. So, I let it do the mixing, kneading and let it rise once. Then I take the dough out, knead it myself and put it in a bread pan. Let it rise for 30 minutes then bake for 30 minutes at 350 degrees. I really like the rectangular loafy shape better than the wonky tubular bread machine shaped 'loaf'. It seems a bit more home made. Plus, I have a little helper who loves to punch down the dough and knead it too :)

I don't think there is anything better than freshly baked bread with butter & honey!


And my sewing project...I've been wanting to make a special bag to take to the library that would be just for books. I bought some adorable apple twill fabric at Joann's yesterday. It was in the remnant bin, I got a great deal on it, almost a yard for like 1.97. I got a good start on it tonight. It's a bit bigger than I planned it to be, but better too big than too small! You can never have too many books.


Here's hoping the planets align for me again very soon....

November 17, 2011

Soup & Dip

This might be my new favorite soup! I got the recipe idea from "Skinny Crock Pot." I like them on Facebook and they have a blog as well. The recipe is titled "Buffalo Chicken Chili" but I really wouldn't consider it a chili, more of a soup really. Here is the way I made it:

Buffalo Chicken Soup

Place in crockpot:
1 lb boneless, skinless chicken breasts
1 can chicken broth
1 14.5 oz can diced tomatoes
1 lg (14oz?) can tomato sauce
1/4 cup hot sauce (Louisiana, Franks, or the like)

Cook the above for about 2 hours on high. Meanwhile, sautee in a little olive oil:

1 carrot diced
1/2 onion, diced
2 stalks celery, diced
2 cloves garlic, minced
2 t paprika

Add these veggies to the crock then cook for another few hours on low. Shred up the chicken when it is cooked through.

Ooooh, this soup was so good, I just love anything "buffalo chicken" flavored. The recipe said to use 1/4 to 1/2 cup hot sauce. I used 1/4 and it was pretty spicy! We had some celery dipped in blue cheese dressing on the side. Today I had some leftover soup for lunch, and after warming it up I put a little spoonful of the dressing in the soup and that was really good too!


Next up is a very yummy dip. I've been making salsa like a mad woman, at least one batch a week for us and often one for my mother-in-law who loves it too. But yesterday I decided to try a little something different. I made the salsa just about the same way as usual but blended it up with a can of black beans. It was so good and I can't wait to make it again. The kids devoured it! The way I made it is really more of a dip since it was thick, but if you add maybe another can of tomatoes it would be more of a salsa consistency.

Black Bean Salsa Dip

1 can black beans, drained & rinsed
1 can diced tomatoes
small handful of cilantro
1/4 of a small onion, diced
1/2 jalapeno, diced
juice of half a lime
garlic salt to taste

Put everything in the blender and blend it up. It was so good, I could just eat it all up with a spoon! I just love the combination of flavors, and very healthy too!


**totally forgot to mention that I added corn to the dip too. Probably 1/2 cup frozen corn kernals, thawed.


October 31, 2011

Pumpkins Part II

I made my own pumpkin puree this weekend, so easy and economical. I need to buy up some more pumpkins before they disappear from the stores, make more puree and freeze it. This is a good step-by-step instructional for making it.

I needed a hostess gift to give this weekend for some friends who had us over for dinner. I used my pumpkin puree and made these Pumpkin Apple Struesel Muffins and this easy Pumpkin Butter. Both turned out wonderful and you know what's really wonderful? Smearing the pumpkin butter ON the pumpkin muffins (of course, I had to try both before giving them as gifts!)

I changed the recipes just ever so slightly so I'll reprint my versions here.

Pumpkin Apple Steusel Muffins
2 cups all-purpose flour
1/2 cup whole wheat flour
1 cup white sugar
1 cup brown sugar
1 tablespoon pumpkin pie spice
1 teaspoon baking soda
1/2 teaspoon salt
2 eggs, lightly beaten
1 cup canned pumpkin puree
1/2 cup vegetable oil
2 cups peeled, cored and chopped apple

3 tablespoons all-purpose flour
1/2 cup brown sugar
1/2 teaspoon ground cinnamon
4 teaspoons butter

Preheat oven to 350. Lightly grease 18 muffin cups or use paper liners.

In a large bowl, sift together dry ingredients. In a separate bowl, mix together eggs, pumpkin and oil. Add pumpkin mixture to flour mixture, stirring just to moisten. Fold in apples. Spoon batter into prepared muffin cups.

In a small bowl, mix together streusel toppings until mixture resembles coarse crumbs. Sprinkle topping evenly over muffin batter.

Bake for 30 to 35 minutes, or until a toothpick inserted into a muffin comes out clean.


Pumpkin Butter
2 cups pumpkin puree
1/4 cup orange juice
2 teaspoons pumpkin pie spice
1 1/2 cups white sugar
2 teaspoons ground cinnamon
1/2 teaspoon ground nutmeg

Combine all in a saucepan; stir well. Bring mixture to a boil. Reduce heat, and simmer for 30 minutes or until thickened. Stir frequently.

Transfer to sterile containers and chill in the refrigerator until serving.

Here they are:


Linking to Tempt My Tummy Tuesday

Pumpkins!

Friday night was our burg's annual Halloween party downtown that includes a fun pumpkin decorating contest. My son & I have entered the past 4 years and my crazy creative kid has WON the kids' division for the last 3 years!! This year he came up with a design of a spooky pumpkin escaping a haunted graveyard. He did everything absolutely all by himself except for me spray painting the box lack. I wish I could've got a video of when they announced that he was the winner, he was so excited!!

Here it is:

A close-up of the gravestone and Otto trying to escape the grave:


And I struggled trying to decide how to decorate my pumpkin. I poured over google images trying to find something unique and fun. I stumbled across this idea from a neat blog I found, That Artist Woman. I just fell in love with the diorama idea! This was the one she featured:


I changed my design somewhat, here is my final product:


The purchased items include the owl (World Market), red credenza (Dollar Tree), skeleton & rat (Dollar General). I made the curtains & foot stool out of sticks and fabric scraps. The window panes are sticks. His chair is made from a toilet paper tube. I had the little pumpkin in my fall decor already and the rest of the stuff is from the back yard! Sticks, grass, leaves...I made even the little broom, that was fun. The welcome mat & Halloween sign are birch bark that my son gathered when he was out searching for supplies for his. To hold it all together I used a LOT of hot glue, tacky glue and straight pins. It actually ended up very secure and made the trip there & back in the trunk with no problem.


I used two battery powered tea lights on the "ceiling" to illuminate the inside of the pumpkin. I carved out a place up top then used two long kabob sticks to hold them in place.

Unfortunately I did not win the grand prize (voted by a few judges) but I did win the "people's choice award" which was still plenty exciting for me! I had so much fun making it and I'm already coming up with plans for next years, I'll definitely do another diorama but something a bit different. I hope for my sanity's sake I start a bit earlier this year, though I think I work best under pressure.

I call it the "skeleton bachelor pad." I think he needs to turn his lights off and go to bed....which is where I'm headed too.


HAPPY HALLOWEEN!

October 23, 2011

The Easiest (and possibly the yummiest) Potato Soup Ever

My mother-in-law gave me this recipe a few years ago, it's so easy and so good that it's hard to believe this soup is low-fat. It's so rich and yummy! I misplaced my scribbled copy so I was thankful to find it online HERE. Just a note, when buying the gravy mix, look at the ingredients and try to find one without the hydrogenated stuff. I've used McCormick and surprisingly enough the WalMart store brand is without it as well. Low-sodium broth is always good to use too.

The last couple times I made it, it was so thick it really needed more water or some milk to thin it out for it to truly be a soup. But the kids liked it thicker, it's more like a big bowl of mashed potatoes & gravy when made as written. And really, who doesn't love that?!

Reduced Fat Potato Soup
1 package frozen loose-pack hash brown potatoes
2 cans fat-free chicken broth
1 package fat free country-style gravy mix
1/2 cup water

1/2 cup chopped green onion for topping
1 cup shredded reduced-fat Cheddar cheese (optional)

In a stockpot or Dutch oven, combine the hash browns and chicken broth. Bring to a boil, then turn heat to medium-low, and simmer for about 10 minutes.

In a separate bowl, stir together the gravy mix and water. Stir the gravy mixture into the potatoes, and allow to simmer until thickened. Remove from heat and let stand for a few minutes before serving.

Serve hot topped with chopped green onions and grated cheese.


Linking to Tempt My Tummy Tuesday

October 17, 2011

Hunger-Squashing Snacks

I got another helpful email from Eat This Not That people. This is "12 Hunger Squashing Snacks." Good timing because lately my snacking is a bit out of control and mostly consisting of sugary carbs. Seems I always have my hand reaching in a cereal box or grabbing crackers or muffins or bread. Nothing totally unhealthy, just things that don't keep me full for long and often leave me feeling tired and/or bloated. Many of the snacks on this helpful list are protein rich which is what I need to keep me full longer and not cause that sugar crash that I get sometimes.

I really like the articles on this site, but I find it annoying that you have to click through each one to see the next featured food, restaurant, whatever. I know they do that to up the advertising opportunities, but sometimes it takes so long that I just give up. I'm listing these snacks here more for my benefit than anything, to have them in a place that I can refer back to when I need ideas. So here they are:

12 Hunger Squashing Snacks

1-Warm toasted nuts: Toss a combination of nuts - pecans, almonds, peanuts, cashews - with chili powder, black pepper, and a pinch of cayenne. Roast in a 400 degree F oven for 10 minutes, until warm and toasty.

2-Ants on a Log: Slather celery with smooth or chunky peanut butter. Dot with raisins.

3-Boil a few cups of frozen edamame until tender. Drain and toss with a light coasting of sesame oil, red pepper flakes, and kosher salt.

4-Make your own souped-up trail mix: Combine 1 cup almonds, walnuts, or cashews or a mix of all three) with 1/2 cup sunflower seeds and 1 1/2 cups dried fruit: raisins, apricots, apples, prunes, and/or banana chips

5-Spread the inside of a pita half with plenty of hummus and top with sliced tomato, onion, and lettuce.

6-Stuff cherry peppers or bottled Peppadew peppers with soft goat cheese or mini balls of fresh mozzarella.

7-Lay a slice of swiss cheese on a cutting board. Top with a slice of deli turkey and a spoonful of hummus or guacamole. Wrap like a jelly roll and eat.

8-Cut fresh mozzarella into 1/2-inch cubes. Skewer on toothpicks with pitted green olives and sundried tomatoes.

9-Pop a bag of popcorn. While it's still hot, toss the popcorn with a half cup grated Parmesan and a good amount of chopped fresh rosemary.

10-Combine a can of tuna with your favorite salsa. Use Triscuits for scooping.

11-Pop a bag of popcorn. While it's still hot, toss with a tablespoon of melted butter, then 2tablespoons of sugar and a teaspoon of cinnamon.

12-Pave a slice of toasted wheat bread with peanut butter and banana slices. Top with a drizzel of honey.


Don't those all sound good? Except for the olives and goat cheese, ick! And I have no idea what Peppadew peppers are, but I'm willing to find out cause they sound really fun. And that last one actually confused me at first with that word "pave." I thought that was some fancy food term pronounced pa-vay, like it was French or something. But now I see it's just the word pave. Like pave your bread like you'd pave your driveway. I think my brain is officially fried from spending most of my waking hours with a crazy 3 year old. That's my only excuse.

Happy snacking!

October 16, 2011

New Kitchen Decor

Lately I've been inspired to spruce up the house a bit (having company over is great motivation). Anyway, I have/had a lot of empty spaces that needed to be filled. I framed a few pictures that I'd been meaning to frame for a while and put hubby to work hanging things. He just loves drilling holes in the walls. I didn't have a very big budget for knick knacky things so I went to Goodwill and found a few fun kitschy things for the kitchen area that called my name.

Here's the first one, Mr Squirrel


I don't particulary like squirrels but I love nuts and thought it would be fun to store some of mine inside of his. I hope that doesn't sound too naughty.

Here's another critter, a cute rooster.


Here they are on my kitchen shelves. That Dansk pot up top I bought at Goodwill to sell (they do fairly well on Ebay) but I decided I liked its funkiness as well so it's a keeper.


Here's my new napkin holder on the kitchen table atop the mushroom placemat I made a while back.


And this next one is not cheap nor silly, I received a very nice frame for my birthday from my favorite aunt & uncle (I don't think any of my aunts or uncles read this blog so I feel pretty safe saying that). They framed a cute birthday card in it that I left there for a while, then I decided I was tired of being reminded that I just had a birthday. I thought it looked nice on my bar counter in the kitchen right above where I do most of my food preparation, but I didn't really have a good picture to put in it. So I decided to find a kitchen poem or saying and frame it. I just googled "kitchen sayings" and found a couple then doctored them up on Picnik. Here's a few of what I came up with-


Those two bottom ones say, "A pinch of patience, a dash of kindness, a spoonfull of laughter and a heap of love." So cute, but I ended up using that top middle one. Here it is in the frame-


That vase beside it is another one of my Goodwill finds. It's a Haegar vase and I really love it with my World Market "twigs".


I don't really have a decorating style and I've always struggled with choosing things for the house fearing that I'm breaking some sort of rules. But I've decided that's silly and I should just choose things that make me smile or remind me of somebody or something that I love. These few new little things make me happy!

October 11, 2011

Squash Pie

I bought a butternut squash the other day, they were only 39 cents a piece! I wasn't sure what I was going to do with it, I thought maybe make some good soup or something. So, today I decided to peel it and cut it up and while I was doing that I realized that it looked, smelled and even has the same seeds and slimy innards as a pumpkin. Then I remembered my son saying the other day how much he liked pumpkin pie. So I did a little searching and found this recipe for "Better than Pumpkin Pie." Really, just think about it...butternut squash. Butter. Nut. Squash. Its name just screams "make a dessert out of me!" So, I did. I think most people forget that pumpkins are squash too. Anyway, I already had a ready-made pie crust in the fridge and strangely enough had evaporated milk in the pantry (I don't even remember buying it). And so I whipped up this pie and it turned out really good!


I'm actually not a huge pumpkin pie fan but I honestly think it's pretty yummy (especially with whipped cream on top). If I didn't know it was butternut squash I wouldn't even give it a second thought, I would think it was definitely pumpkin. I might even sneak this into Thanksgiving dinner this year.


October 10, 2011

Chicken Enchilada Soup

This is nothing really new or groundbreaking, and it's very similar to the tortilla soup I make quite often but this recipe was just different enough that nobody complained that it was the same old thing I always make. It is a combination of simple tortilla soup and another recipe I had cut & pasted, not sure where it originally came from. It's a super simple dump everything in the crock pot meal, perfect for a lazy Monday.

Chicken Enchilada Soup

Put in the crock pot-
2 or 3 boneless skinless chicken breasts
1 can diced tomatoes
1 can ro-tel
1 small can tomato sauce
1 packet of taco seasoning

Cook this on high for 2-3 hours or till the chicken is done. Then cut up the chicken into small pieces. I have been known to just mash it all up with a potato masher, usually the chicken gets soft & tender enough for that to work.

Then add-
1 can black beans (drained & rinsed)
1 cup frozen corn
1 can cream of chicken soup (I used reduced fat/sodium)
1/2 soup can of milk

Cook for another hour or so. Then, it's done!

I mixed lime juice & cilantro into some sour cream and dolloped that on top along with some pepper jack cheese, green onions and diced red pepper. I forgot that I had some tortilla chips, they would've been good crushed up on top too.

Here's mine-


And my daughter insisted I take a pic of hers. She doctored it up all by herself.


She loved the soup and finished her whole bowl. It helped to have the motivation of seeing Barney at the bottom when she was all done.


And today I'm proud to say we had several foods from the 'foods you should eat everyday' list. Breakfast was oat pancakes with walnuts, we had yogurt for our after school snacks, the soup had black beans and tomatoes and we had some carrots & peanut butter for our before bed snack. That's 6 out of 8. Not bad!


October 04, 2011

8 Foods You Should Eat Every Day

I got an email today from the "Eat This Not That" people and I thought it was very interesting! It said you can get all the nutrition you need if you eat these 8 foods every day plus some kind of lean protein.

* Spinach
* Yogurt
* Tomatoes
* Carrots
* Blueberries
* Black Beans
* Walnuts
* Oats

I don't think I could swing JUST those 8 for me or the family but I've decided that next week when there's a little more grocery money in the tank that I'm going shopping and I'm going to try to incorporate as many as I can into our meals & snacks every day for a week.

I just love a challenge (and all the foods sound really yummy to me!)

September 29, 2011

Make-Ahead Pancakes

I've had good intentions for a long time to make a big batch of pancakes on the weekend, freeze them and have them for breakfast in the coming week. It always seems like such a good idea during the week but our weekends are always packed full of other stuff that needs to be done, so making a large batch of pancakes doesn't ever seem like a priority. I finally carved out a chunk of time this past weekend and did it! I wanted to find a recipe that was hearty and healthy but tasty to and I found this Grain and Nut Whole Wheat Pancake recipe that got some good reviews. I changed a couple things, wasn't sure the family would go for me using totally whole wheat flour so I used half white and half whole wheat. Also, I didn't have any buttermilk so I used the old trick of a bit of vinegar mixed in with regular skim milk. And lastly, I used applesauce in place of the oil then lowered the sugar a bit since the applesauce was sweetened. And you better believe I added the optional nuts! These pancakes turned out so good! And they froze so nicely, layered with wax paper in between. They separated with no problem and warmed up yummy, not gummy or rubbery.


And instead of syrup, we've been topping them with strawberry sauce. For some reason, we had an overabundance of strawberries this week so I made this easy sauce. I used about 1 pound of strawberries, a half a cup of water and a half a cup of sugar. Cooked till bubbly and mushy then blended it when cooled. De.lish.us. (makes a good ice cream topping too)


Having these ready every morning this week has been so nice. I warmed them up while the kids got ready and served them with a turkey sausage link and a glass of milk. I think it makes a rather well-rounded breakfast with some carbs, whole grain, some protein, dairy and a little bit of fruit to boot. This isn't the most exciting picture but I'll share it anyway. They looked and tasted about 100 times better than they appear in this photo.


The recipe made 12 large pancakes and that was enough to last us till today (Thursday), so we will be having a cold cereal Friday morning at our house. But, hey, it's Friday so I won't let anyone complain!

Here's the recipe how I made it (and with a new name ;))


Nutty Wheat & Oat Pancakes
1 1/2 cups old-fashioned oatmeal
3/4 cup white flour
3/4 cup whole wheat flour
2 teaspoons baking soda
1 teaspoon baking powder
1/2 teaspoon salt
1 1/2 cups buttermilk (I used 1.5 T of vinegar combined with enough milk to make 1.5 cups)
1 cup milk
1/4 cup applesauce
1 egg
1/4 cup sugar
3 tablespoons chopped walnuts


Grind the oats in a blender or food processor until fine. In a large bowl, combine ground oats, flours, baking soda, baking powder, and salt.

In another bowl, combine milks, applesauce, egg, and sugar with a whisk until smooth. Mix wet ingredients into dry with a few swift strokes. Stir in nuts.

Lightly oil a skillet or griddle, and preheat it to medium heat. Ladle the batter onto the hot skillet; cook the pancakes for 2 to 4 minutes per side, or until brown.


September 26, 2011

Birthday Apple Pie

I had a birthday this past weekend. A big one. I'm 40 now. It bothered me a bit at first but now that I'm a couple days into this new decade I've decided that it's all gonna be okay. I'm probably the most content I've ever been and I'm learning to appreciate life and all it's little pleasures even more as the years go by.

I'm not one for big parties so we just had a small family get-together. And I made my own birthday apple pie because I know everyone loves it and because I had the time to do it. It's a dutch apple pie recipe that I've had forever but don't even know where I got it. It's very simple but sooo very good.

Here is my worn out 'apple pie with crumb topping' recipe card in my special recipe card holder cookbook that was given to me as a wedding shower gift years ago. I'll type out the recipe in case you can't read it ;)


Dutch Apple Pie
4-5 c. sliced apples
2 T flour
1/2 c. sugar
1 t cinnamon

Combine this filling and place it in an unbaked pie shell.

**I have never in my 40 years made my own pie crust. I just buy the crust already made, already in the pan. Simple, easy clean-up, and it always tastes just great.

Bake the apples in the crust at 450 for 10 minutes.

Topping-
1 stick of butter, softened
1 c flour
1/2 c brown sugar

Combine till crumbly and pile on top of the partially baked pie. Lower oven temp to 350 and bake for 35-40 min longer till it looks like this-


It's always good to place the pie pan on a cookie sheet because stuff likes to come a'bubbling over the sides and it's much easier to clean a cookie sheet than the bottom of your oven.

When I made it this time, I had more apples than I needed for one pie but not enough for two. So, I baked the extra in a small pan with some of the toppping on top, sans crust. Totally delicious as well and saves you some calories & fat. So, this recipe could be baked as a crustless pie or apple crisp as well. You really can't go wrong with any baked combination of apples, sugar, cinnamon, butter, flour and more sugar. The taste and the smell...it's pure autumn happiness in a pan.

September 24, 2011

Table Runner

I made this table runner as a practice for some possible Christmas gifts. It went together quite easily and I like it, but I haven't decided if I'm up for making 5 more as I had originally planned :( This one I made is rather fall-ish looking so it fits right in with all the fun decor we just dug out of storage.


I'll never claim to be an expert binder.  As you can see, it is a bit rough around the edges. And I know my backing/binding shade of red is a bit off but since this was kind of a practice piece I wasn't too picky (especially since it was in the 1/2 price remnant bin at Joann's).


It is a simple disappearing 9-patch pattern using 27  5" squares, I got the idea HERE. I used felt as batting to keep it from being too 'puffy'. I haven't washed it yet, I'm afraid it might not lay as flat when I do, so I'm not too anxious to try. I'd love to have one of these for each holiday/season and change them out on the coffee table. I'll have to add that to my ever growing project list ;).

September 21, 2011

Dried Apples

Tis the season for apple-y things! We sliced up some apples today and made these "chips."  My recipe called them chips and said to bake them for 2 hours, I baked them for closer to 3 and they still didn't end up crispy like chips, just kinda dry and chewy but still really good! Next time I'd do a larger batch since that is a long time to have the oven going for just one pan-full, plus, I bet they'd freeze well for later.

(chewy) Apple Chips
• 3-4 apples
• 2 tbsp sugar
• 1 tsp cinnamon

Core and thinly slice apples about 1/8-inch thick and arrange in a single layer on baking sheet. Combine sugar and cinnamon. Sprinkle evenly over apple slices. Bake at 200 degrees for 2-3 hours. Remove from oven and cool completely before transferring to a sealed container.

Here they are before baking-


And after-


Kinda sad how much they shrink down!


And here they are posing next to our lovely little fall candle/squash decor-


Looking forward to many more apple goodies in the coming weeks!  Happy almost Fall!

September 18, 2011

Spooky Shirts

The other day one of my online mommy friends mentioned having fun with 'freezer stencils.' I had to google it to figure out what in the world she was talking about, and that led me to learning about this neat craft!

Freezer paper...found it at the grocery store right near the aluminum foil and saran wrap. I've never bought it before, never needed to, but now I have a ginormous roll in my kitchen drawer that will most likely be used for non-kitcheny things. The box itself has instructions for fabric stenciling so I can't be accused of stealing anyone's genius idea here.

The possibilities are endless (think tote bags, throw pillows, even wall art) but I started with t-shirts, 99 cent t-shirts from Goodwill to be exact.


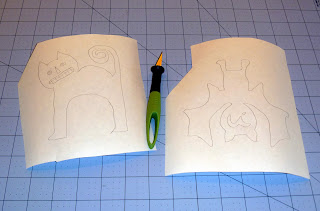
And I decided to do Halloween shirts for the kids. The holiday lends itself to basic silhouetted images so that made it easy for a beginner like me. I googled "halloween clip art" and found a couple cute designs. I read that you can put freezer paper through your printer, but since ours was out of ink I didn't even attempt that. With my luck it would've gotten clogged or jammed in the printer anyway, then I would've been in big trouble. So, I chose the primitive method of tracing. Right from my laptop screen. I just put the paper up and traced very VERY gently with a pencil, drawing on the non-shiny side of the paper.


Then I took my exacto knife and cut out the design, including little eyes, mouths, etc.


Next, using a hot dry iron, I pressed the paper, shiny side down onto the t-shirts. First I ironed the main part of the design then added the little "island pieces" last. Those were the trickiest parts.


After placing a piece of cardboard inside the shirt and using acrylic paint mixed with fabric medium, I painted on the designs, being very careful around the edges with brushstrokes moving inward, not outward.


Once they were painted I just couldn't wait the 4-6 hours for them to dry. I propped them up and pointed a fan on them and they were dry in less than an hour. Then comes the fun part, peeling the paper off!


My edges aren't perfect and some parts could've used a second coat, but I'm lazy and decided they looked just fine. Better than fine actually, I was quite pleased with how they all turned out. The kids thought they were pretty cool too.


Here's a little closer look at the designs-


After waiting the full 24 hours, I used a hot dry iron to "set" the paint. The shirts need to be washed inside out as well.

What a fun project this was! Now, I have a blank tote bag calling my (and my freezer paper's) name...


I'm linking this to Cauldron Crafts, a fun array of crafty ideas just in time for the Halloween season, brought to you by my friends at Distant Pickles and Fabric Donkey. If you link YOUR spooky craft idea to them soon, you could win a fabulous fabric bundle!